Daily Internet Bandwidth Monitor-Automation:
Create Powershell Script:
Here, we monitor the bandwidth range at regular intervals using a PowerShell script.
Before continuing, get the URL of the speed test portal and the recipient's email address and Outlook mail configured on the machine used to run this script.
Please find the script below,
# Get the default sender email address from Outlook
$outlook = New-Object -ComObject Outlook.Application
$namespace = $outlook.GetNamespace("MAPI")
$defaultSender = $namespace.Session.CurrentUser.AddressEntry.GetExchangeUser().PrimarySmtpAddress
# Get the current date in the required format (MM-dd-yyyy)
$today = Get-Date
$currentDateFormatted = $today.ToString("MM-dd-yyyy")
# Construct the URL for the CSV file
$url = “https://testmy.net/tools/database/csv/query.php?type=user_name&q=XXXX+IT+Admin&dateFull=$currentDateFormatted” # xxxx-Write your Network name
# Get the current date in the required format (ddMMyyyy)
$currentDateFormatted = Get-Date -Format "ddMMyyyy"
# Modify the attachment filename
$attachmentFileName = "${currentDateFormatted}.csv"
$attachmentFilePath = "C:\$attachmentFileName" # Specify the complete file path including the filename
# Create a WebClient to download the CSV data
$webClient = New-Object System.Net.WebClient
$csvData = $webClient.DownloadString($url)
# Save the CSV data to a file
$csvFilePath = "C:\$attachmentFileName"
$csvData | Out-File -FilePath $csvFilePath -Encoding UTF8
# Create a new Outlook application
$Outlook = New-Object -ComObject Outlook.Application
# Create a new mail item
$Mail = $Outlook.CreateItem(0)
# Set properties for the email
$Mail.Subject = "Bandwidth Report"
$Mail.Body = "Please find the attachment."
# Attach the CSV file
$Mail.Attachments.Add($csvFilePath)
# Set the recipient
$Mail.Recipients.Add("
# Send the email
$Mail.Send()
# Dispose of objects
$Mail = $null
$Outlook = $null
Write-Host "Email with attachment sent successfully"
Copy and paste this script into Notepad, then save it with the.ps1 extension.
Automate via Task Scheduler:
Step 1: Visit the task scheduler.
Step 2: Right-click and create a task.
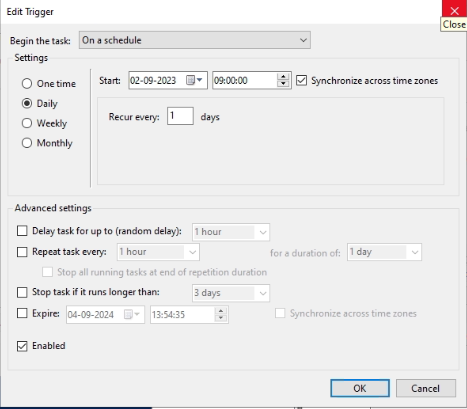
Step 3: Next, select the timing (we migrating daily way) from the trigger tab.

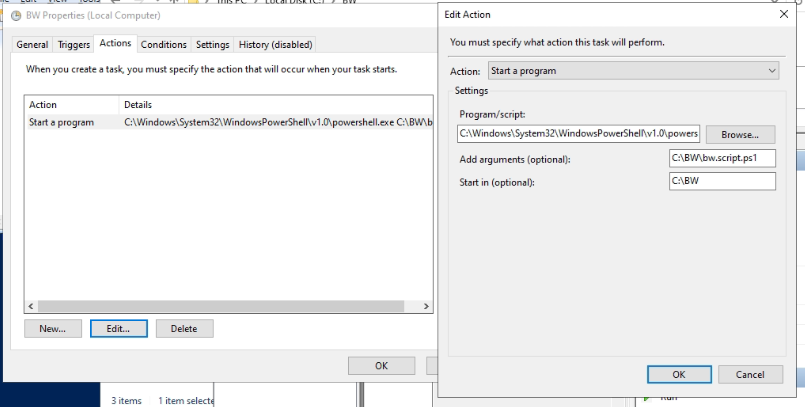
Step 4: After that, select the below path on the Action tab.

Step 5: Apply, and then OK. The trigger was started.
Remarks:
When finished, the output is sent via email and saved in the C:\DDMMYYYY.csv (Today's date).
